Showing posts with label Medieval. Show all posts

Monday, July 11, 2016

Couching & Laid Work - Couched Cord

For my Couching & Laid Work back up pieces, I needed one showing simple couched cord as a decoration.  I decided to make a cover for my Kindle Paperwhite for less obtrusive use at events.

First, I obtained a cover to fit my Paperwhite, with space for the cover to be folded over.


I chose a design from La fleur de la science de pour traiture et patrons de broderie façons aralïque et ytalique par Fr. Pelegrin, de Florence, which can be found here. Published in 1530. I chose the "bones" of the design found at 22r. Four of the motifs fit the middle of my cover well.

Next up to was to obtain materials.  I found a lovely piece of brown linen, then a trip to my local needlework store yielded tapestry weight wool for the cord and silk for couching down. I selected "my colors" of blue and gold.

Construction started with cutting a piece of the linen larger than the open cover.   I hemmed the piece of linen and assembled folded in for the book cover.  I did this to ensure that the embroidery will be  centered properly on the cover.

Here the Kindle is in the cover.  I would have preferred a larger turn over, but the way the Kindle fits in the cover precluded that.  Once the cover is done I will lace it in place to keep it better anchored.


Next, I pinned the design, which I had traced, onto the cover.


Unfortunately, the brown  linen is too opaque to use the light box.  Therefore, I had to choose another transfer method.  Since I have no "pounce" on hand, I chose the stitching method.  I carefully stitched through the paper, following the lines of the design, using a simple back stitch.  I used yellow for the places I intended to couch down yellow wool, and blue for the blue -- figuring that in this way I would limit the amount of the stitched guide lines that would need to be removed later.  Then, I carefully tore away the paper.  A thinner tracing paper would have made this easier, but with careful, steady work, it all came off without distorting the stitching. 
There we are, all outlined and ready to go.  Kind of pretty that way, too, really like this design.  Yes, those are my glasses.  I often do fine work without my glasses on -- my nearsightedness means that very close work is easy for me without correction. 

Next, it was time to start laying cord.  I started with the larger section of the blue.  For that section only I pinned the "cord" in place (though as I worked I adjusted the laid cord to more carefully follow the guide lines. 

First round down.  Since the subsequent cords would need to be "woven" through for the over/under, I carefully couched on either side of the guide lines.  Now, I was sure I had taken pictures of the next phase, but apparently I did not.  I took a large tapestry needle and loosely wove the inner blue cord, then couched it down.  Next I did each of the yellow ones. 

Blue done, starting on yellow.

All done the basic couching
Having finished the basic couching, I removed the guide lines that were showing, to have a cleaner look.  At this point, the only couching is to anchor the loops and one either side of each cross. After removing the guide lines, I went through and placed additional couching. 

And, there it is, all done -- on the cover.  My plan is now to do an applique on the back -- with couched cord around the edges. Once the linen cover is done and laced into place, I may couch cord around all the edges, but that will be addressed once the back is done. 

Close up of one quadrant


Monday, June 6, 2016

Marshall Hanging Update

Saturday I was at an event and took my Bayeux Tapestry inspired piece -- the one I call the "Marshall Hanging"

I got some more done on the figure representing my husband.  That figure, especially the top of it, is proving to be the hardest to do.  Not for any problem with the design, but for the location. It is *just* in the middle of the frame -- and *just* far enough from all edges to make it difficult to reach. I can work on only a little of it at a time.
Photo by Lissa Underhill
Having done a little of that work, I moved to the second cat figure.  Since I am often asked, I tracked the time it took to do the outline.  This outline took one hour and twenty seven minutes.  Now, I was chatting often while working on it, working at home with less distractions will go faster.

I very much enjoyed the day, sharing my work, learning about that of others, and spending time in the "modern middle ages."  Now it is time to get my planned downstairs work space set up so I can really motor through the rest of this piece.


This week I'll be working on embroidery, working on research, and preparing materials for teaching embroidery at a demo this coming Sunday.  On to 'all the thread, all the time.'


Monday, May 30, 2016

Progress!

While I'm working on my designs and schedule for the projects for my expert panel in September, I returned to a project that I really wanted to complete well before this -- and certainly before the "all couching all the time"  -- the sample for my German Brick Stitch class.

Here is a picture of the completed embroidery.

Because I made the mistake of working it all the way to the frame, the edges aren't quite neat enough, but I'll fix that once it's off the frame and I can get at the holes.  Then I'll trim the edges and do a lining.  The line where the design changes will be the bottom, and the top and bottom will be the opening at the top of the bag.  I'll attach lining pieces to the two ends then sew the lining seams (side and bottom).  The bag I'll fold wrong sides facing and fold in the side seams and over stitch - first with some linen, and then with one of the silks for a decorative edge.  That will prevent the need to turn it after stitching which can put extra stress on those seams.  The lining bag will tuck in, and then a drawstring will go in at the top.  Photos of the finishing will be a future blog.

Overall I'm happy with the piece as a teaching piece.  I would normally do all one design, but I wanted the teaching piece to have an easier and a more difficult counting design offered.

Now, on to preparing for next weekend's event, where I will be working on the Marshall hanging and enjoying time with other fiber arts folks.


Monday, May 9, 2016

Project page updated

Things in my life are actually getting a bit more even keel and there *will* be more embroidery to report on soon.  In the meantime, I spent some time adding some of my older projects to the "DONE - Historic and SCA" page.

I still have a number of projects for which I still need to dig out the photos.  There are some that have not been blogged or webbed at all, and some that I have just quick notations of on the old "Elizabet Embroidery" page (link to the right under "Other Things to See") which has not been updated in way too long....

Added to the "Done" page are links for a couple Brick Stitch projects, a book, and this little guy, one of my first SCA projects:


Now to go do some thready things -- and enjoy this return to spring. 

Monday, May 2, 2016

Randomness - German Altar Frontal - maybe not the one you think

Many people who study medieval textiles are familiar with this late 14th Century piece at the Cloisters. A quick look back, I'm not sure I've talked about it, but that's for another day -- I certainly have photos enough of the piece which incorporates brick stitch in a different manner than the bags, pillows and box covering I've talked about lately.

Today, I decided to turn to LACMA (L.A. County Museum of Art) for a random piece.  I entered the search phrase "Embroidery medieval," and this was the one hit. (There are other pieces within "SCA  Period" but that's the one that came up for that particular word search.) It has a very different style to the background, yet it does have those lovely figures with the brick stitch fills, and very similar colors.

I will certainly be giving this piece some closer study soon.  I was going to do some of that study and say more, but I want to get this posted -- running late because my cat decided that this evening was the perfect time to learn whether she can be in the exact same place as a (full) glass of red wine.  Hint: no.  Good thing we had an extra keyboard around the house.
Germany, Lower Saxony, circa 1380 LACMA M.79.48

Monday, April 4, 2016

More randomness

During a recent romp through the on-line collection at The Philadelphia Museum of Art I came across this interesting little piece -- accession number 1894-30-94.

(c) Philadelphia Museum of Art
Listed as a "lace edging" it is colorful embroidery on net, with the not-very-precise dating of 1200-1400.  The description lists it as silk net with silk embroidery which has been stiffened with wax.  It is a long piece at 58 inches, and quite narrow at 2 inches high.

Closer of one section
Looking carefully at the photograph on the website, I do not believe it is Lacis (as currently identified).  The stitches do not look woven, but more like other embroidery stitches such as stem or split, simply done on a net-like fabric rather than a more closely woven one.  To really be sure will call for a visit to the museum to try to see the piece.

This item strikes me very much as one for secular use.  The stiffening with wax leads me more toward it being for household use rather than clothing.  Could it have been trim on a wall hanging, or the edge of a box style cushion?  I also think it quite possible that this is a piece that did not come from a larger workshop.  Though beautiful, it does not have quite that "something" that a professionally done piece might have.

The colors shine though, and it certainly sings to me on this early spring day that feels more like winter.

I know I have seen other pieces of colorful embroidery on net -- I'll have to find the time to do some research on them.  Meanwhile, I will enjoy these flowers and pea pods, knowing that the real ones cannot be far behind.


Monday, March 28, 2016

New Feature: Random Item

So, while I quietly work in the background, as it were, on several projects that really don't have much share-able, I decided on a new "feature" here on the Study.  The Random Item post.  The idea for these posts is that I will find a piece in one of the many on line collections and talk a little about it.  It may be something I've seen in person, it may not.

For this first installment, I chose this Band from the V&A: It is a red silk band embroidered with silk and gold thread, animals in roundels alternating with lozenges intertwined with floral motifs. Dated by the museum as 1150-1200 and currently believed to be English.  It is V&A Accession No. 8237-1863.

Ok, so more-or-less random.  Basically, I put "Embroidery 1200" in the search box and this was one of the hits.  Since it actually dates to the time and country of my SCA persona, I determined it is a good candidate for Random Item.

This band is one of those delightful mystery items which are sometimes all we have.  The item information describes that it is cut on all four sides, making the original form and use uncertain. It is made up of several roundels with animals and lozenges with flowers. The animals are described as a dog or cat, a lion or leopard, two bears back to back....
(C) Victoria and Albert Museum, London
And this delightful bird, possibly a peacock.
The stitching is described as underside couching of gold work, with split and stem stitch design details in colorful silk threads.

The vendor said that the band came from Halberstadt Cathedral, however later study, and based on the technique and design, they now believe it to be English.

The use of this lovely band is not now known, though the V&A notes that "pieces like this were typically used as decoration for vestments."

I am particularly struck by the animals and flowers on this piece. This band may well have been on vestments, but it looks like it would be equally happy as the border of a hanging, or even the hem of a special garment. (Unfortunately, the information does not have the size, I'll have to see if I can find out more).

The colors are reported to be somewhat faded, and much of the stitching is worn, but this fantastic photo of the back gives some idea of the wonder of this piece.
(C) Victoria and Albert Museum, London
Having browsed on the V&A Search the Collections, I'm loving this piece and am inspired by the fact that it is, quite possibly, from my persona's time and country.  There may well be a bird in circle, or flower and lozenge showing up in some of my work down the line.

Monday, February 29, 2016

Applique Research

One of the supporting projects for the expert panel is to be an example of "couched cord around applique."  I've played with a couple of ideas for this project, with none of them really "sticking."  Then, I heard about the heraldic display challenge for Mudthaw.  Heraldic banner -- that's it!

Applique is great for banners and hangings.  It is a great way to cover a large area of fabric with a design, and is (or can be) quick to do.  Because of the usual "up there" nature of the display of banners, it is also usually a less "fussy" form of embroidery.  (Applique can also be very very fussy, but that's not what I'm going to be doing).  It is also a form that spans centuries.

So, I started looking at banners with applique and couched cord.

There's this Spanish banner at the Met.
Banner, Spanish 1596. Met Accession No. 58.172 Gift of Melvin Gutman

And then there's this long Spanish one at the Boston Museum of Fine Art.


For quite a while these two pieces were vying for the place of honor as the "inspiration piece" for my project.

Tab from a banner
Ashmolean Accession No.  EA 1984.134
However, there is another group of applique that really sings to my heart -- several pieces of Egyptian work like this one at the Met and this one at the Ashmolean.
Fragment, 13th-14th century Egypt. Met Accession No. 1974-1131


Fragment Late 14th to Mid 15th Century
Met Accession No. 1972.120.2
Fragment Late 15th to Early 16th Century
Met Accession No. 1972.120.3

Those examples do not have the couched cord around the appliqued figures, but this and this one at the Met do.


My final design is a bit of an amalgam of these.  It will be a banner of linen on linen, using mostly white or off white.  To use SCA heraldry, there will also be blue and gold -- as the final banner will display the household badge my husband and I registered.

This weekend I'll be pulling out fabrics and getting the pieces cut.  I may have to actually fabricate cord from silk threads, but we'll see.  This may mean another trip to Fireside, but since I'll be heading there Saturday for the final shopping for my class the following weekend, that's not a problem.

Monday, February 15, 2016

Pelicans for Mael Eoin

Another project can be revealed!  A number of months ago I was approached by a friend to do embroidery for a Pelican cloak* for her husband. She gave me the date of the planned event, and I consulted my calendar.

Now, as those who follow this blog probably know, I am working on projects which will be the body of supporting work when I present for Expert ranking some time this summer in the East Kingdom embroidery guild Keepers of Athena's Thimble in the Couching and Laid work category.  Since as much of my work as possible needs to be towards that end, I suggested an embroidery that would apply, and my friend agreed.

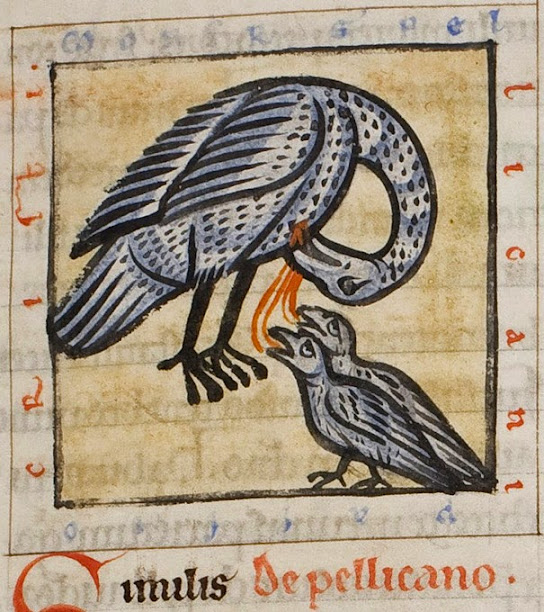
Next was research.  There are a number of pelican in piety images that are commonly used in the SCA, but I wanted something a little different.  The recipient has a 12th Century persona, so I went looking for a 12th Century depiction of the pelican.  I found a lovely website with lots of pelican pictures: http://bestiary.ca/beasts/beastgallery244.htm. Among the pictures was this one, which simply called out to me.  

It is from MS 89/54, Folio 6, Groosteminarie Library, Bruges, which contains an Aviary of Hugh of Fouilloy, dated to ca. 1190-1200. I suggested to my friend two small medallions on the shoulders of the cloak based on this illustration, reversed to face each other, done in the laid and couched technique known as convent stitch.  

No, convent stitch is not actually period to the time of the illustration -- this was an "SCA stretch." It was, however the only way I could fit doing this project in my time schedule and she was happy with the presented design and plan.  

I used some nice sturdy linen from my stash and Splendor silks to execute the design.  My "artist" was, as in many of my projects, a good clear print out of the source picture traced, then copied at ratio to fit the size desired and reversed, also on the copier.  This was in lieu of my own art skills (negligible, tracing is kind of the limit of it), and an in house artist. 


First, the outlines, ribbons of blood and feet were done in stem stitch.  I used two strands of splendor for the outlining.  I used a lighter shade for the outlines of the baby birds than for the mother bird.  Should I do such a project again, I would use the same for both, as I think there is not quite enough contrast on the baby birds from a distance.  
Anyone else thinking "vampire birds" here?  
Next, I filled the bird bodies with convent stitch, using a lighter shade in each instance. One aspect of convent stitch that was interesting to me is that it is all straight up and down.  Unlike other embroidery forms, even other laid and couched forms, there is no definition provided by using different directions.  

Next, a nice deep blue (chosen in conference with my friend) for filling in the background.  It wasn't until I was nearly done filling in the first one that it occurred to me to mark the couching lines. and now the babies have no legs.  
Neither of those bother me much, Most people will see these from a distance. This is primarily a ceremonial item, and only those who are really good friends will be close enough to see that the lines are not perfectly straight.  

I did find that silk does not really want to play at convent stitch.  Wool, which is the fiber used in many extant pieces, would "fluff up" and fill in for better coverage than the silk.  I compensated by taking extra stitches after an area was done if I felt the couching had opened up the laid stitches to allow too much of the background through. 

The final touch was dark gold chain stitch around the outline, which added a pop of color, a good sewing place for mounting, and helped to even off the edges a little bit. 


My friend brought over the cloak that had been made by someone else (and a lovely cloak it is, too), and I hung it on my dress form and positioned the medallions.  I carefully whip stitched them in place, catching only the cloak (not the lining) all the way around.  


Now that it has been presented, the recipient and I will get together at some point, with him in appropriate garb, to check the positioning and adjust if necessary. I'll try to get some good shots of him in the cloak and do a follow up post.

Another really cool aspect is that part of the elevation includes a scroll -- here is a picture of the scroll done by Natalia Anastasiia Evgenova -- she used the same illustration.  No, we didn't coordinate that! I'm going to call it "great minds thinking alike!"

Photo by Photo by Constable Calin Macsalny of Barony Bhakail
*Yes, this is an SCA thing.   For those not in the SCA, the Order of the Pelican is the society wide honor given for service.  Typically a cloak or other outer garment is given, usually with a depiction of a "pelican in her piety."

Monday, February 1, 2016

Some on line goodies

My wonderful trip to New York to see their exhibit which included many period embroidery books had me doing a little poking.  There are a number of design sources on line, including scans of some embroidery designs.

One is Johann Siebacher's Schön  Neues Modelbuch von allerley lustigen Mödeln naczunehen, zuwürcken unn zusticken, found here.  You can download a pdf of the book, or just view it.

Here is a lovely page from this book.  St. George is a common image -- and those lovely stars in the lower design are also very common in many forms of embroidery.

Image 00063

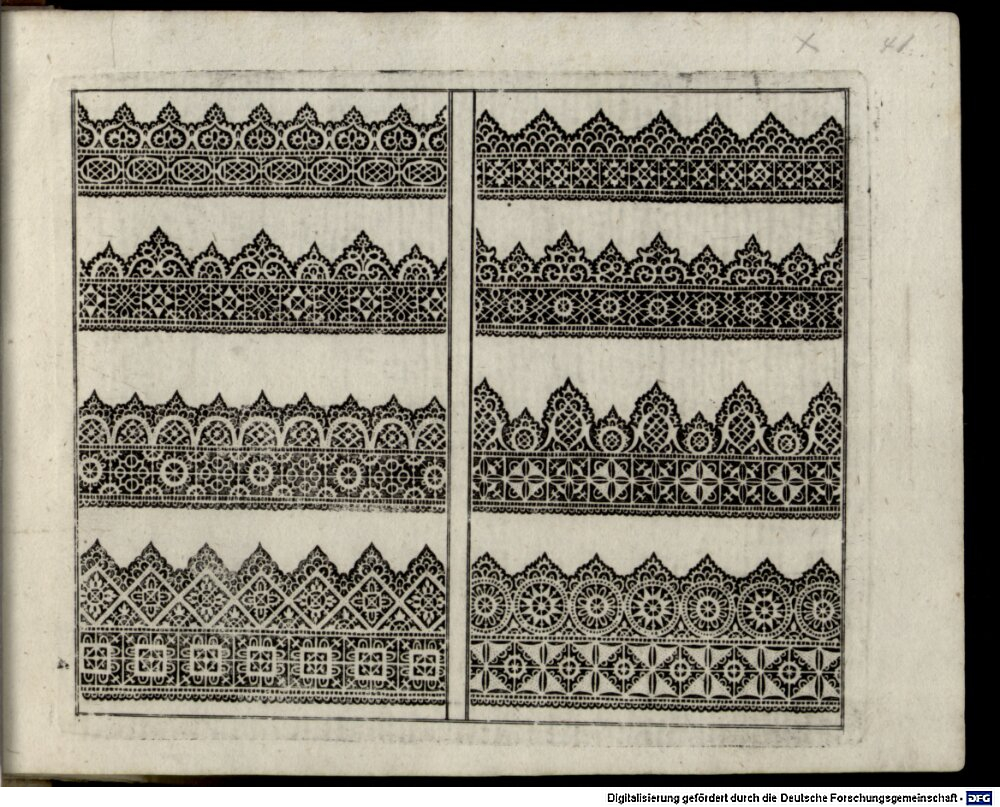
There are also pages with needle lace patterns:
Image 00083

Another one that is available on line is Federico Vinciolo's I Singolari E Nuovi Disegni. The Dover edition of this book is one of the first ones I bought when I first started doing historically based embroidery.  It is available on several sites, here is one.  This one will be familiar to many as "the purple cover."   The Vinciolo also has both charted designs and needle lace patterns.

In fact, one of the charted designs is one that I used for one of my earliest pieces done for the SCA.  I did this stag in several forms -- canvas, free and blackwork -- each of them a little bag.  I was originally going to do it in all 12 of the Athena's Thimble categories (though I haven't figured out how I was going to accomplish it in a couple of the forms).  Perhaps some day I'll come back to that plan.


Here's a picture of the canvas work stag.


One of the groups I am in on Facebook is Historic Hand Embroidery.  There, a link was given to a blog post of a list of modelbuchs, including links to ones that are on line.  I forsee an afternoon of clicking and downloading :)  Here is the Modelbuch list.

There are a couple of things to remember about these books:  They are very "late period" to people in the SCA, they freely "borrowed" from each other (you will find designs repeated across books), and unlike today's pattern books, they give no guidelines as to how the embroider was to be executed.  There are no color keys, no stitch diagrams, no materials lists.

So, as I continue to work on the pieces for my upcoming classes and for my big couching & laid project, I am also building up my "to do" list as I peruse these books.  It may be time to make some lists.


Monday, January 18, 2016

Another museum piece.

Well, once again, I'm between being able to show you new work of mine.  So, today I'll show you one of the pieces that was in the recent exhibit at the Met.  This cloth totally blew me away on so many levels.  It is Accession Number 51.147, Cover Containing Animals and Floral Ornaments.   A beautiful linen piece, it is embroidered net (Lacis), cutwork and needle lace.

The lacis is incredibly fine.  I couldn't get the exact gauge, but it is easily 15 holes to the inch or more. In this shot you can also see some of the cutwork and some of the needle lace.


This happy dragon has some little friends -- any surprise I focused on the squirrels for a photo?


Some of the squares showed more wear than others, and there were a couple of places that showed probable repair, but overall the piece is beautifully preserved.

Here is a square of the needle lace, and a couple of the cutwork.  The lacis panels are larger squares, with these smaller squares making up borders.


It's a large piece, and was displayed in a manner which made it really easy to study.  It is so large, it took three photos to get the whole thing. There is a lot of material here for inspiration.


Even when I have a lengthy list of on decks projects I love taking time to look through photos, and search museum collections websites.  There is a creative energy trapped within those threads that flows and renews my energy, even for applying to completely different projects.  An hour with these images and I am usually revved up to get back to my needle and thread. 


Monday, January 11, 2016

Another process post.

When last we left the process of creating my German Brick Stitch class (here) I had selected materials and was about to settle on design.

Stage 3 Design confirmation

I knew that I want to jump from some of Master Richard Wymark's patterns.  They are clear and concise, and he had the advantage of being able to study the original pieces extensively.   After a little fiddling around, I stayed with my original plan to bounce from the item identified as part of a stole or mantle.  This is a nice easy pattern, all the stitches are the same four count. This will be the first part stitched in the final project and the one covered in the class. I have strayed from my original plan for the second design, moving to a different embroidered bag design.  It is similar to the one I was originally going to use.  It is a more complex design, requiring a little more attention to counting as the stitches vary in length from two to six count. 

For the class both designs will use the same colors: dark red, dark gold, yellow, blue (all silk) and white (linen).  

Stage 4 Stitch testing

Finally, it was time to test everything.  Normally for testing for a project, I just do a small bit of stitching including all colors on a "scrap" piece of fabric.  In this case, however, "stitch testing" was actually "kit testing" -- make sure the information will translate, confirm how much thread will be needed, consider shots to take for the handout.

I started by assembling my frame and marking the stitch area.  The piece will be stitched on a rectangle -- half in one design and half in the other.  When removed from the frame it will be folded in half and sewing up on the sides to make a bag.  I am not including photos of how I marked out the stitch area -- because it is not the way it will be done for class.  Not that I don't want to show I can mess up too, but because I don't want to confuse people.

Finally, I began to stitch.

Here is the main motif done in colors selected.  To make the project a little easier, I am dropping the animal motifs and simply doing an alternation of the motif as shown and the motif done with white linen thread and filled with the dark gold.  All motifs will have the blue "spots."

The reasoning behind the revision relates mostly to streamlining the design for learning -- and for reduction in the number of colors needed.

I completed the first half and quickly determined that the Trebizond silk I bought will not be the recommended thread for this as a learning project.  This photo shows one of the reasons.  Trebizond is picky.  It twists up, coverage is inconsistent from color to color and to have enough to finish the project it will be *expensive*. The kits will not be inexpensive, but the Trebizond was going to make it very much so.

Of course, I'll finish my first bag with the Trebizond, but the second one will be done with Splendor -- one of the recommended threads.  yes, there will be a second one, I still have to do photos for the handout.

 Progress shot. Once I had the first motif in place, I placed the rest of the lattice, first in the red, then the gold.  All those diamonds will be filled in once the center motifs are placed.

 Here all the motifs have been completed, ready to fill.
And finally, the full piece -- or the one half.

Ultimately, I did a larger area than we will do for the class.  This gave me a solid 'feel' for the design and plenty of opportunities to determine recommended stitch and working order.


I'm working on the second side now, the lattice is in place and the center motifs have been started.   Then, I just need to write up the handout (while doing a second, smaller piece).

Monday, January 4, 2016

Welcome back and happy new year

The end of year holidays are over, and A Study in Textiles is back.  It's Monday, so time for some historic embroidery talk.

Over the holidays I was able to go to the Met to see the exhibit "Fashion and Virtue" which focuses on embroidery design books, mostly from the late 16th Century (with a couple things earlier and a few things later).  The exhibit continues through January 10 -- and if you've been thinking about it, and still have the chance, I would say GO.

Fortunately, photos are permitted (of all but one item).  I will also say that the Met knows how to put on an exhibit of textiles.  Pieces are displayed in such a way as to be able to get pretty close to the items, to really *see* them.

I have a full album of my photos (and a few other things I photographed that day) on Flickr (feel free to grab my photos, but please give full credits, both to the object owners and to me).  For most items, the label follows the photo(s).

But, I really want to share a couple of things.

For instance, there is this lovely photo, showing the pricking holes used to transfer this embroidery cartoon to fabric:
That's the kind of detail in an exhibit I love to see.  Not only does it cover "oh, look, here are beautiful things" but also "here are things that are beautiful and were used and here is how they were used."

Of course, the focus of the exhibit was the embroidery books or "modelbuchs."

There were a lot of them.  Certainly more than I have ever seen in one place (eve in reprints).

One of the things that was clear is that the printers of these books "borrowed" liberally from each other.

For example, here is a page displayed as being from one book (Christian Egenolff, Modelbuch aller Art Nehens vn[d] Stickens 1`535 -- and yet, I know that some of the designs on this page appear in at least one other book.

There were a number of motifs and designs that appeared in several places throughout the exhibit.

The exhibit was vast, and the photos will provide much for me to talk about in future posts (For instance, I will want to devote a post just to the embroidered net....oh, yes).  I spent over two hours and took over 350 photos -- and there was a lot that I did not photograph.  It was a wonderfully constructed exhibit, and I only wish I had gone earlier in its run, so that I could have gone again.